Color correction process is done during post production using digital color colorecting software. The term D.I stands for ‘digital intermediate’ which was coined few years back when filming or capturing images done by motion picture film. It was scanned to a digital medium and color corrected then recorded to an intermediate film stock and then it would be processed back to a negative to make prints that would go to theatres.
But now films are shot using digital camera, post processed digitally and presented to theatres again in a digital platform. There is no need for a intermediate but the term Digital intermediate (D.I) still stayed on which should be understood in today’s workflow as ‘Digital color correction’.
Digital Intermediate is a process of color correction done after final editing is performed. For Cinematographers, a software-based non-linear color grading is one of the more exciting, creative capabilities to have emerged from the recent advances in digital technology.
Images are capable of being manipulated to an almost infinite degree in the new digital color correction.
Today’s digital cinema camera images are designed to achieve image quality and color reproduction later through digital color correction. Therefore, DI plays a very important role during the final stages of a film production.
Digital color correction programme is done by a group of technicians comprising of a colorist, conformist and CG.experts.
After final editing is done with EDL, reference video, and complete full resolution rushes of the film is given to the D.I work station.
Conformist will first examine the recorded images in the hard disk and with EDL he will confirm the images to DI time line as per editing order. This process takes around four to five working days.
Then, colorist starts digital color correction programme.
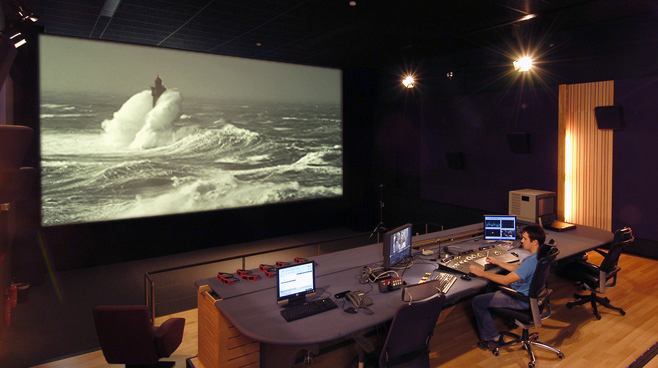
Most of the digital grading facilities are set up like a mini-cinema hall, so that the digital image is displayed on both the computer monitor and projected on the screen. The screen projection allows both the color timer and the cinematographer to make interactive changes and immediately visualize the impact of those changes in an environment that will closely resemble that of the final projection.
However in order for a digital grading solution to be successful, it must be possible to accurately calibrate it. For example, reds displayed in the RGB video color space standard on most monitors look completely different after having been printed to film.
Modern digital grading provides accurate calibration tools that are easy to set up. Facilities with their own color calibration technologies can customize the system to meet their specific needs. Basic calibration commences with the linearization of the display device to avoid distortion of the film color look up tables (LUTs) that will later be applied. This is done using a light sensitive device to measure the intensity of various gray patches that are either displayed on the monitor or projected on a screen.
A correctional LUT is produced that ensures that the display intensity responds linearly to the values of the image – i.e. that the CRT or projector intensity increases in proportion to the color values of the digital image.
Apart from the projector, DI work station is equipped with ‘USER INTERFACE MONITOR’ and COLOR PANEL.
There are different color correction softwares used for Digital film making.
- Lustre
- Scratch Assimilate
- Base light
- Davinci Resolve
- Quantel
- Color